
I’m a model manufacturer
Well, sort of. As I mentioned in my last post, I bought a resin printer. So it was time to put it to work. But what should I make?
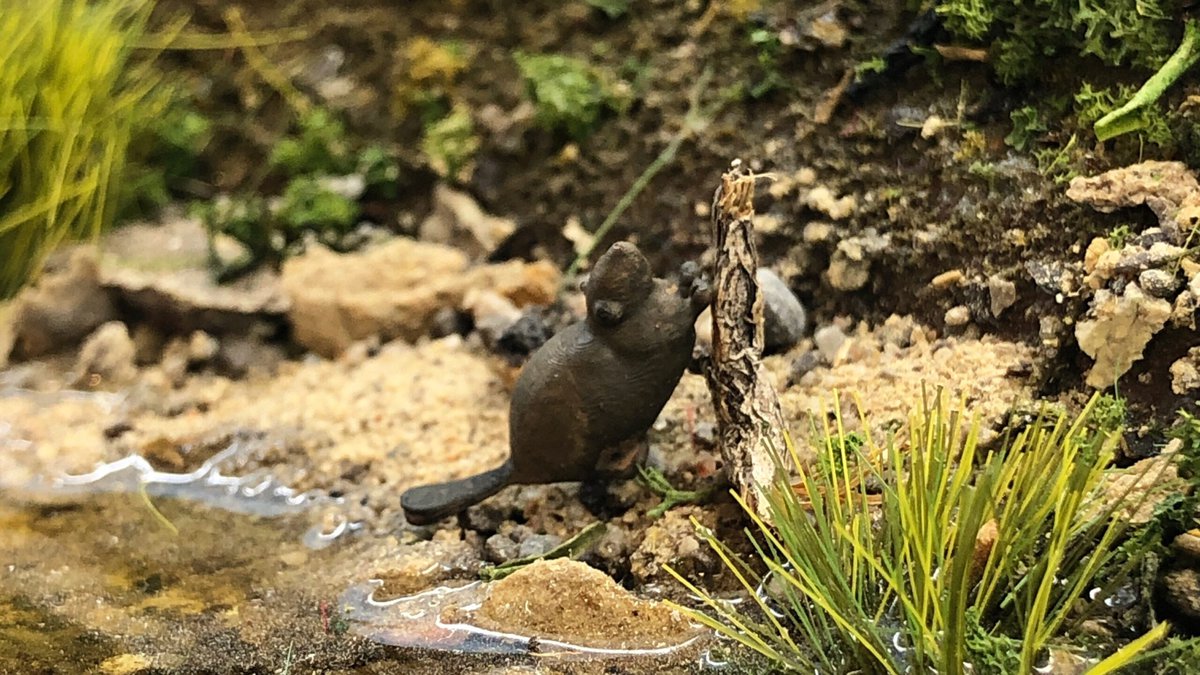
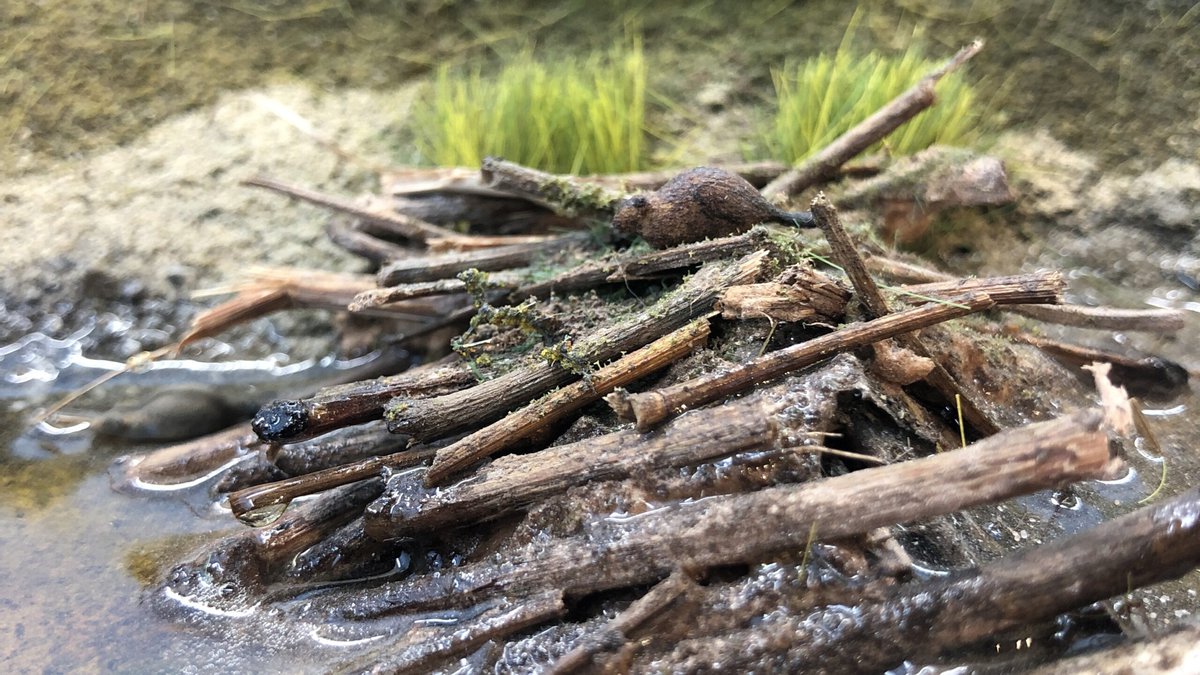
As I lamented, 5 years ago, ‘Why doesn’t anyone make a HO scale beaver?’

I found moose, deer, bears, even wolves, but no beavers. The beaver is iconic. A Canadian symbol. The beaver (and it’s pelt) lured the explorers to this land. Hell, the beaver is so important it’s even on the shield of the Canadian Pacific Railway. So… I made one!
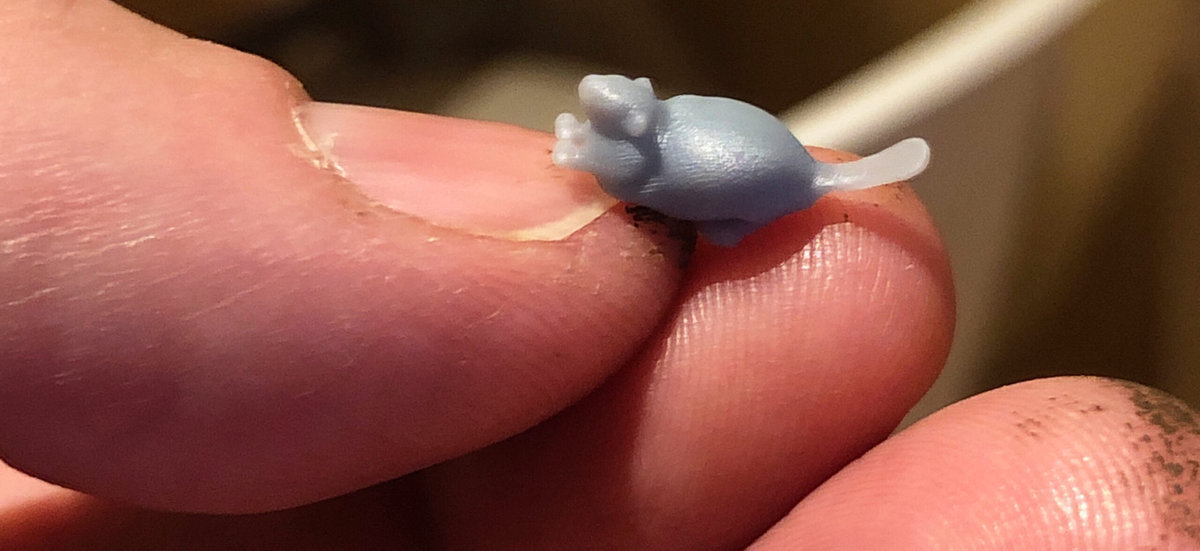
Damn (get it? beaver puns) these things are small.
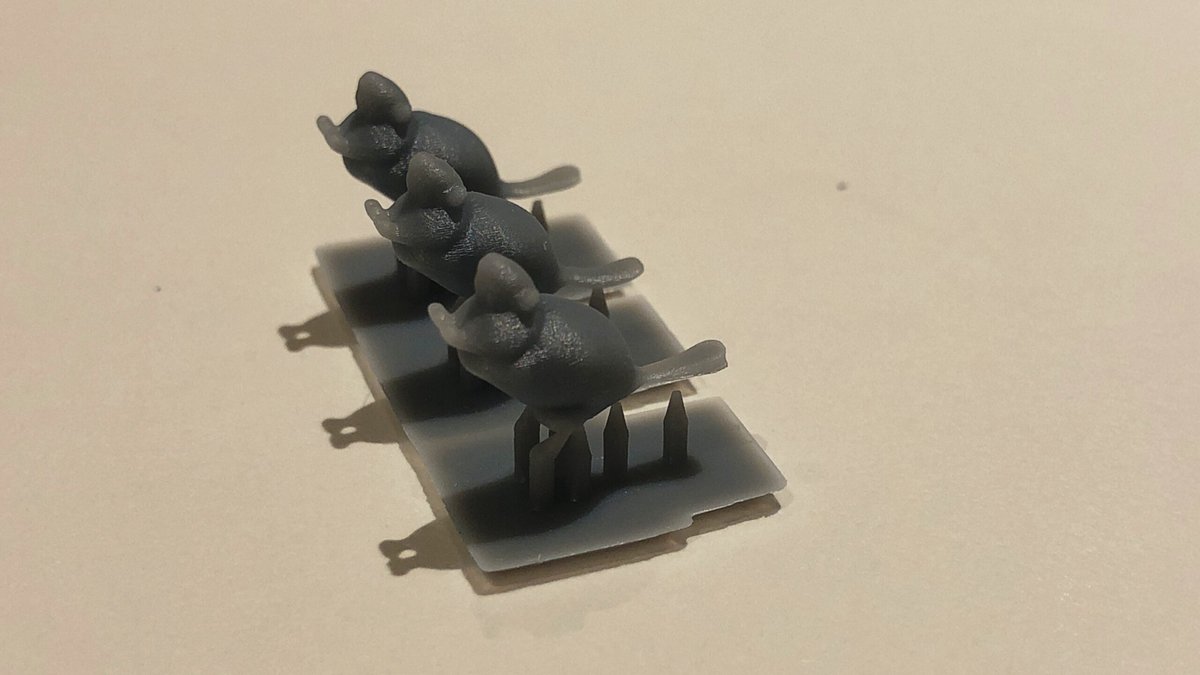
I posted my creations to the Facebook group Canadian Railway Modellers and suddenly started getting requests, so NOW AVAILABLE to you (from me), HO scale beavers. I’m offering 8 beavers in 3 poses (see below):
3 x sitting
3 x standing up
2 x swimming
for $20 (postage included) to any Canadian address, and $25 US to any US address.
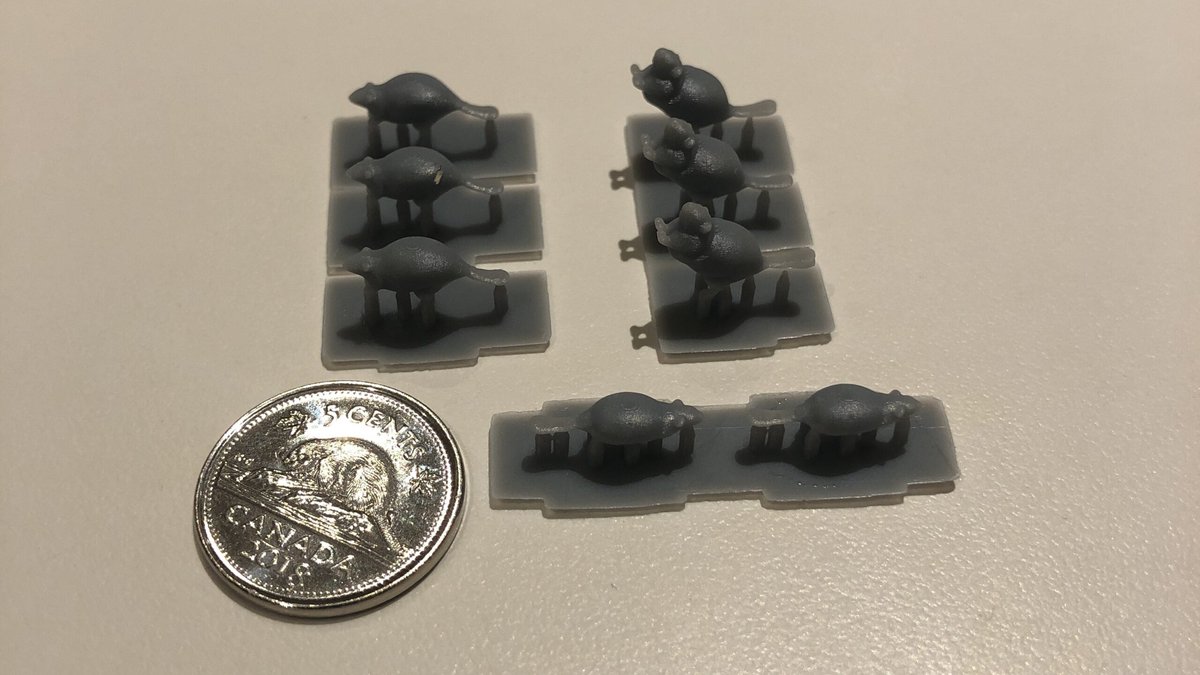
The full set of 8 in all its glory.
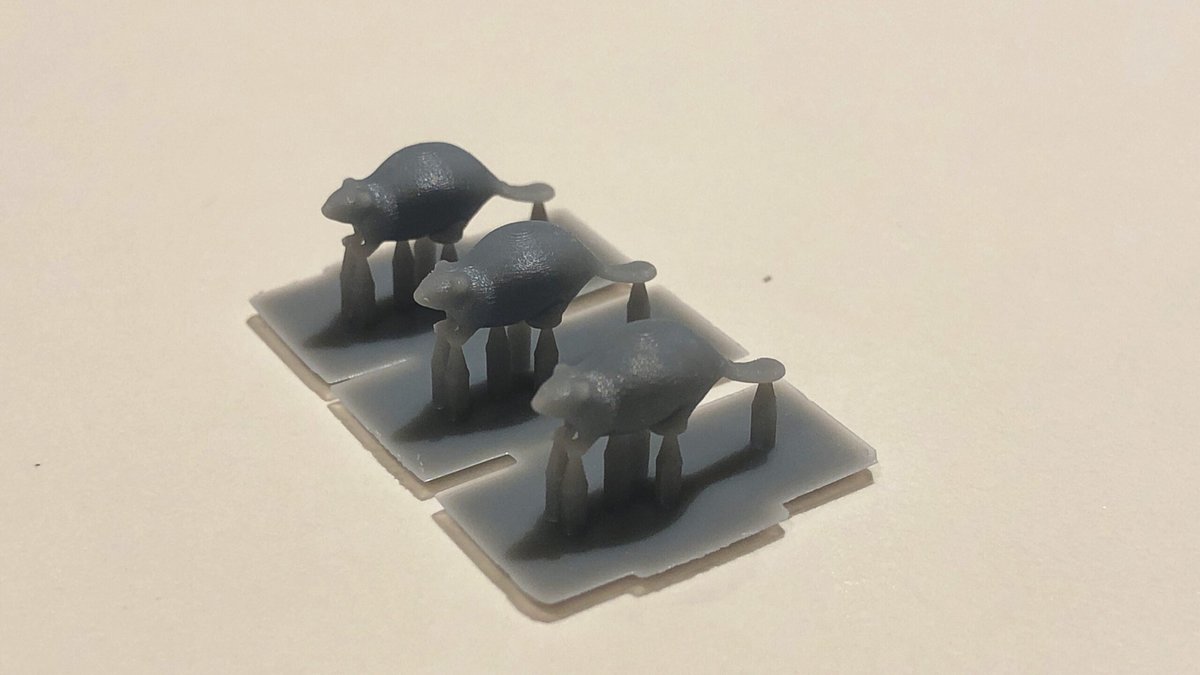
Three (out)standing beavers
Three sitting beavers (ready to gnaw wood).
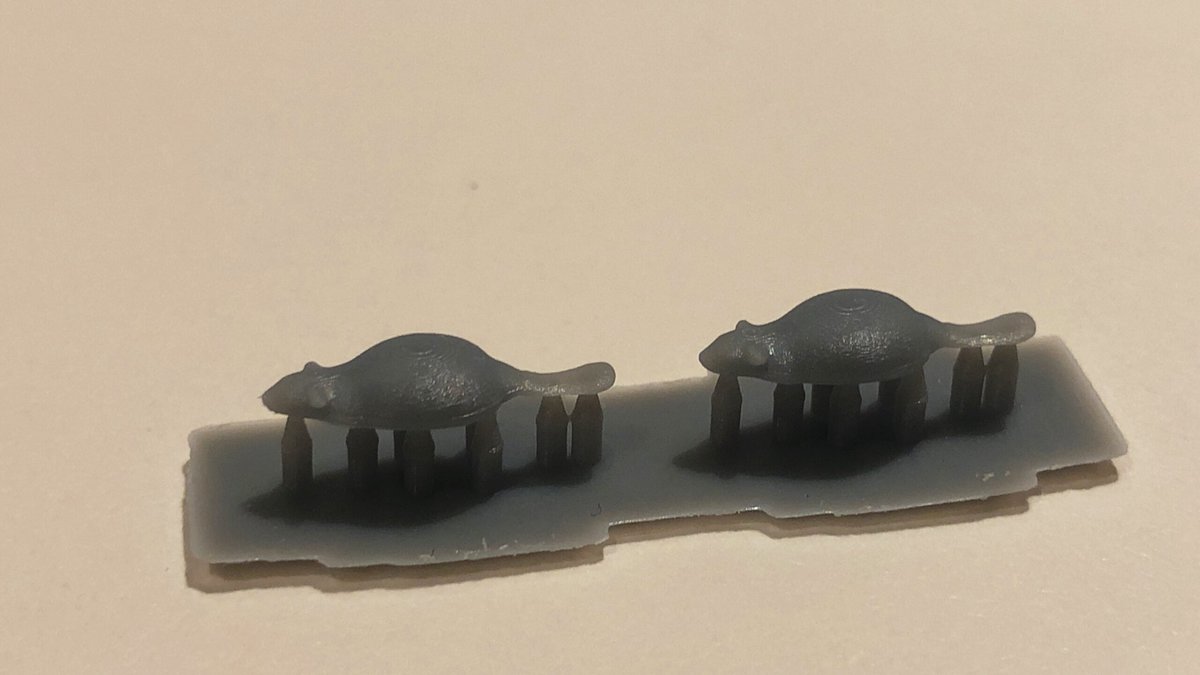
..and…two swimmers.
They look great painted up and satisfaction is guaranteed!
So if you’re looking for a little Canadian beaver (groan), email me at bernard (at) trafficdesign.ca and I’d me happy to make you a set.
P.S. Due to a few requests, they are coming soon in O scale.
I’m a Martian

I joined a Facebook group called 3D Printing for Model Trains and started to see what inexpensive resin printers were capable of. Blew my mind….

Photo from a Facebook post by Kurt Bainum.
Some of you may remember my past foray into 3D when I printed up some scale beavers.
What really got me was a post by Kurt Bainum where he showed the level of detail he was getting printing in HO scale. Then I stared watching YouTube videos and as they say, the rest was history.

Well I was hooked. So, I finally broke down and bought a 3D printer. I picked up a Elegoo Mars UV Photocuring LCD 3D Printer. There is A LOT to learn but happily a large community of owners called (yup) ‘Martians’ who I hope to learn from.
I’ve already got my eye on some nice models over at thingverse and tinkercad and now all I need is a bit of time to head downstairs and see what I can create.
My fallen flag?

Prototype modelling in Quebec City in 2013. I prefer a 1:1 scale railroad.

Rolland Paper Mill in 1957. That’s a lot of boxcars!

Memories of the 70s.


As you can see, it’s pretty easy to accumulate an all orange and black roster.


Sure wish I still had this loco in the display cabinet.
Will the QGRY revert back to CP colours and become a ‘fallen flag’?
Model Local in 2020

Eric Gagnon in his excellent Trackside Treasure blog suggested that 2020 was the year to Model & Railfan Local. He suggested that we do ‘a moustache’ and look at what’s right under our noses. That got me thinking for a couple of reasons.
I run a company that encourages people to shop local and believe that there is an argument that we should be increasingly thoughtful about the impact that our shopping has on local businesses and communities. Local is the new thing and more people are thinking more about their neighbourhoods.
I also live in west end Toronto and just 500m from my house is a former industrial area off the CPR/CN (now Metrolinx) rail lines. Most of the old warehouses and factories are long gone or have been recently converted into wildly expensive hard lofts. But some traces of the neighbourhoods colourful railroad past still remain.

Time to go exploring.
As one of my favourite parts of this hobby is research, I decided to fire up the google machine and check the archives. And then I went for a walk in the ‘hood.

The 1958 City of Toronto Planning Board Atlas is a ‘to scale’ wealth of information of what was.
Sorauren Avenue
1. 239-251 Sorauren Avenue
J.M. Loose & Sons Ltd. (piano keys & actions)
and replaced by Lester & Burton Ltd.
In 1951 they were listed as a woollen mill with over 50 hands.
Here is a first hand account of one of their employees:
https://miriamprl.blog/2015/11/13/finding-a-place-to-call-home/
2. 263-269 Sorauren Avenue
Lowe Brothers Co. Ltd.
This paint and varnish company had between 100-199 hands in 1951. It had a siding on the north side of the building on Wabash Avenue. The building was demolished in the late 1970s and has been replaced by the Charles G. Williams Park.

Wabash Avenue
3. National Equipment Co. Ltd. 1 Wabash Ave.
Canadian Carbonate Ltd. (carbonic acid gas) 5 Wabash Ave.
WABASH AVENUE TEAM TRACK
Eastern Power Devices Ltd., 29 Wabash Ave., Toronto 3. (200-500 employees)
All these businesses are long gone and the buildings have been demolished and replaced with town homes.
4. 40 Wabash Avenue
Canada Linseed Oil Mills Ltd.

The Canada Linseed Oil Mills property on Wabash Avenue, looking north with the Grand Trunk railway (now Metrolinx GO line) behind it. The grain elevators are now gone.
This is the building that really grabs the imagination and is probably one of the best least disturbed industrial relics in the neighbourhood. It was built in 1915 and has been abandoned since 1969. It will live again and is being repurposed into the $40 million Wabash Toronto Community Centre.

The Canada Linseed Oil Mills buildings have been standing on Wabash Avenue for nearly one hundred years. For forty of these years, they have been vacant. Industry’s gradual exodus from the surrounding area has been steady; several nearby buildings which once employed local residents and made products for the community have been retrofitted and reborn as condos or artist’s studios, while other buildings have been torn down completely and placed with new city infrastructure. The Canada Linseed Oil Mills structures have yet to undergo this rebirth, but they have certainly not been forgotten.
Shortly after the turn of the 20th Century, a manufacturing area grew along Sorauren Avenue, just south of Dundas Street. Industry was spurred all along the Canadian Pacific Railway lines lying to the immediate east, which over the years belonged to several railroads including the Credit Valley Railway and the Toronto, Grey and Bruce. The strip along Sorauren was also just south of a major rail junction, near where Annette, Dundas & Dupont streets all come together. From this lucrative location at the northern tip of Parkdale, an industry could easily connect by rail with all of southern Ontario.
from http://spacing.ca/toronto/2010/04/09/building-storeys-the-canada-linseed-oil-mills-buildings-sorauren-park/

Canada Linseed Oil Mills (back left of photo) and Lowe Bros. Paint (front, right) on Wabash Avenue. Check out the team track in the middle of the street!
Sorauren Avenue
5. 345 Sorauren Avenue and 347 Sorauren Avenue
Neptune Meter Co. Ltd. (water meters) (Still Standing)
Line & Cable Accessories Ltd., 1951 (over 50 employees)
Corman Engineering Co.Ltd. (cyl. grinders)
Jack Frost Ice Machine Co.Ltd.
Chapman Double Ball Bearing Co.of Can.Ltd.

An old ball bearing factory from sometime around the turn of the century, 347 Sorauren is actually a composite of the initial mill style warehouse with two new additions, featuring a combination of interesting industrial finishes. It is now a loft conversion that features 15 foot ceilings with massive timber columns and beams. Vintage meets contemporary at the 48-unit Sorauren Lofts building, with dramatically high metal ceilings with open web steel joists and 6-foot windows. https://www.sg.jeffreyteam.com/sorauren-lofts-347-sorauren-avenue/
6. 361 Sorauren Avenue
643 Channell Ltd.(“O’Cedar” furniture polish)
647 Canadian Sunbeam Lamp Co.Ltd./ 647 Cannon Canadian Co. Ltd.(adhesives,glue)
7. 363 Sorauren Avenue
Robert Watson Co.
This is the biggest industrial building left. The factory was built in 1907 and there were additions made in the 1920s. The company was known for their “Watson’s Cough Drops”. Their slogan was “Koff No More” and they marketed them towards smokers who had sore throats. At some point they switched from cough drops to mints.

Great article with more info can be found at https://www.sg.jeffreyteam.com/robert-watson-lofts-363-369-sorauren-avenue/
8. 383 Sorauren Avenue – Doan Coal Co. Ltd. (gone – new condo development)
9. 393 Sorauren Avenue – Wilkinson Foundry Facing & Supply Co.Ltd.

An aerial view of Sorauren and Wabash Avenues circa 1959.
I plan to do a lot more exploring in the neighbourhood and who knows, maybe the next layout will be an industrial Toronto switching layout set in the 1950s!
Super-detailing a Walthers Plastic Kit
My project for the holiday break was to build a Walters plastic kit as a movie prop that my film-student son wanted to use for a stop-action animation project. I figured this was a good chance to practise a few techniques.
I had picked up a Walthers American Hardware Supply kit (below) for cheap at a show a couple of years ago and wasn’t planning on using it for the layout, so this was pretty low risk. I figured that if I ruined it, no biggie.
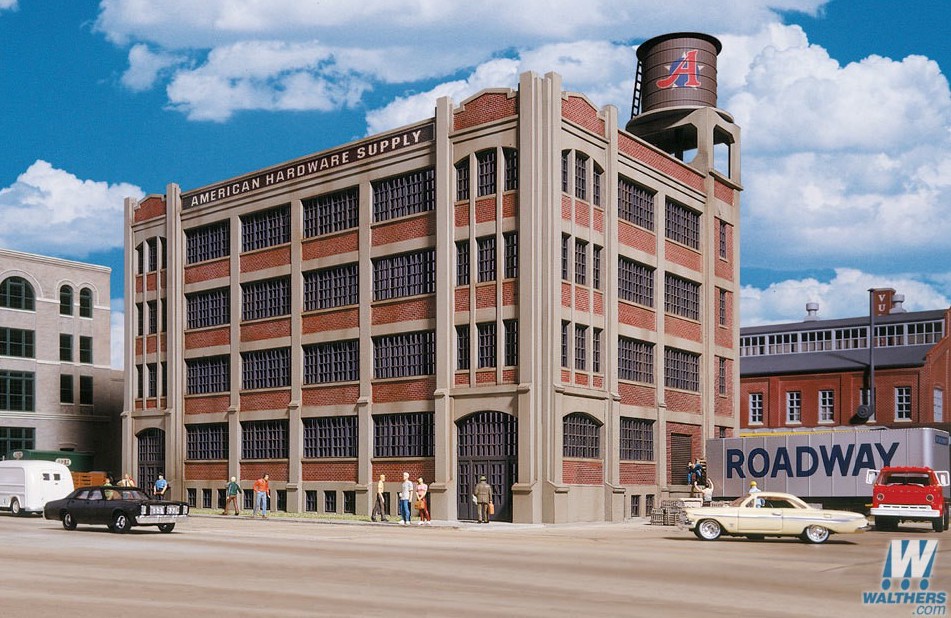
The challenge that I set myself was the following: Could I build the kit as per the instructions, however using all of my (limited) painting and weathering skills, make it look more like a craftsman kit?

In short, the design brief was to elevate the blah plastic kit and make it look decent. Here are a few thoughts and some of what I learned:
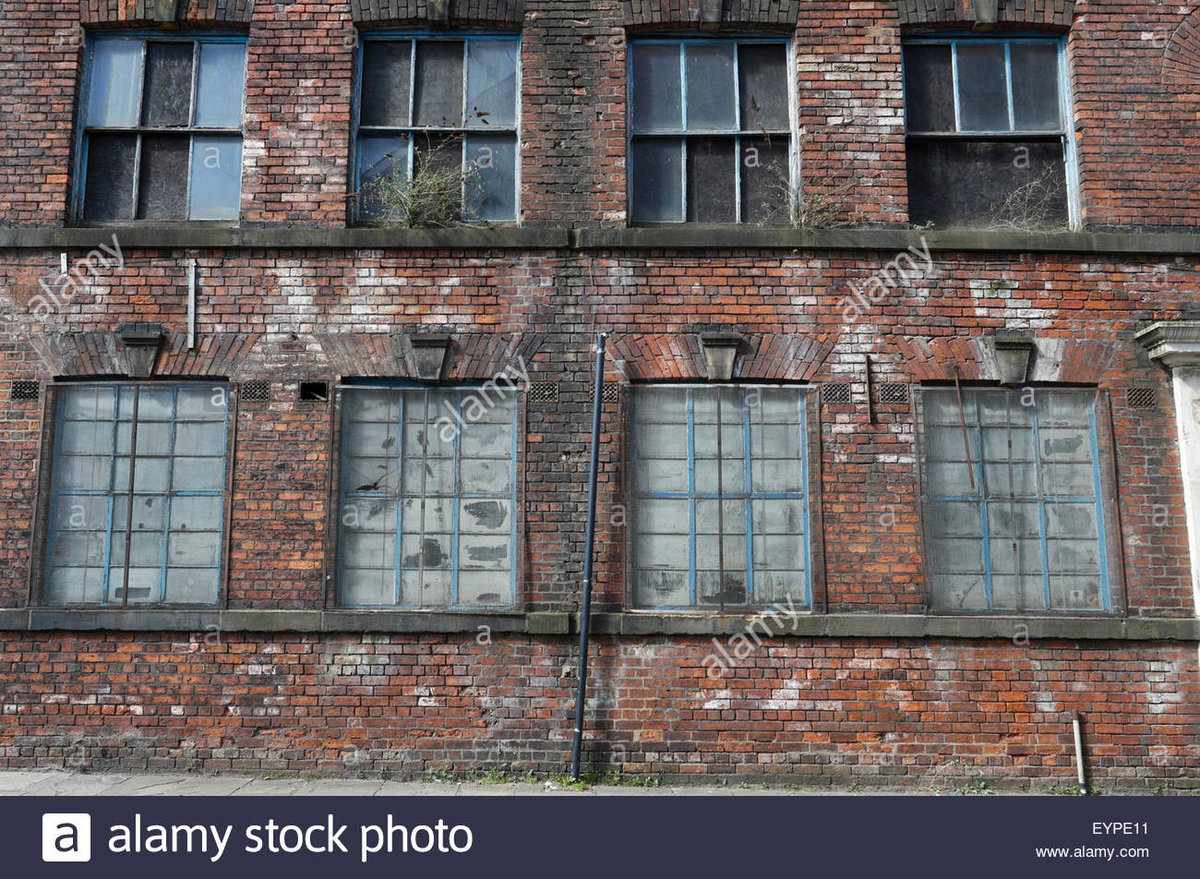
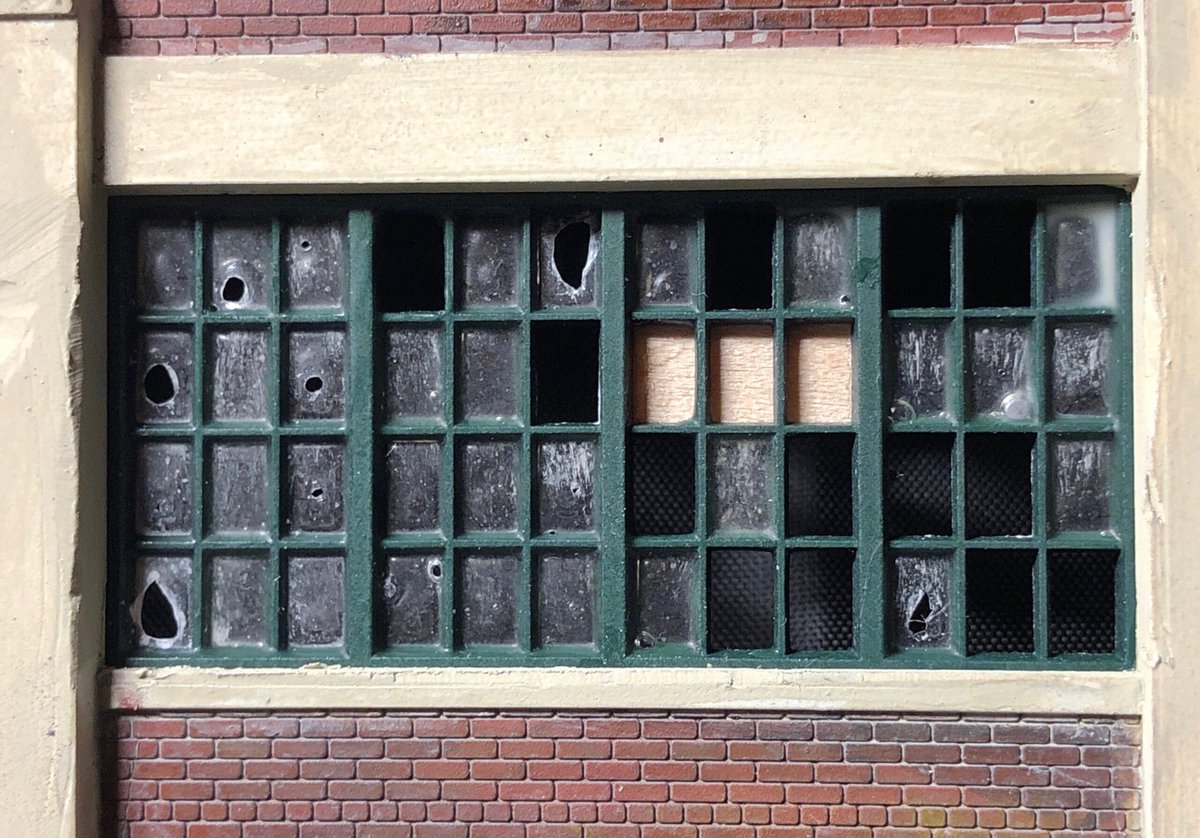
1. Observe the real world and work from photographs. Things don’t always look the way that you think they do. For example, tree bark isn’t brown, its grey. Concrete isn’t grey, it more of a taupe. And don’t get me started on bricks – WOW, just wow.I find that a lot of models look very uniform when in reality things are so incredibly random. I knew that I wanted this building to look really run-down and past it’s prime so I did a quick Google image internet search for “abandoned warehouse brick wall” and really tried to study the complexities of the real world.
2. Don’t be afraid to chop, cut, break and destroy. Reality is imperfect and so should your model. Rough it up. I really tried to shave down the rough edges (see pic below). Clean, crisp plastic with perfect right angles – no thank you.
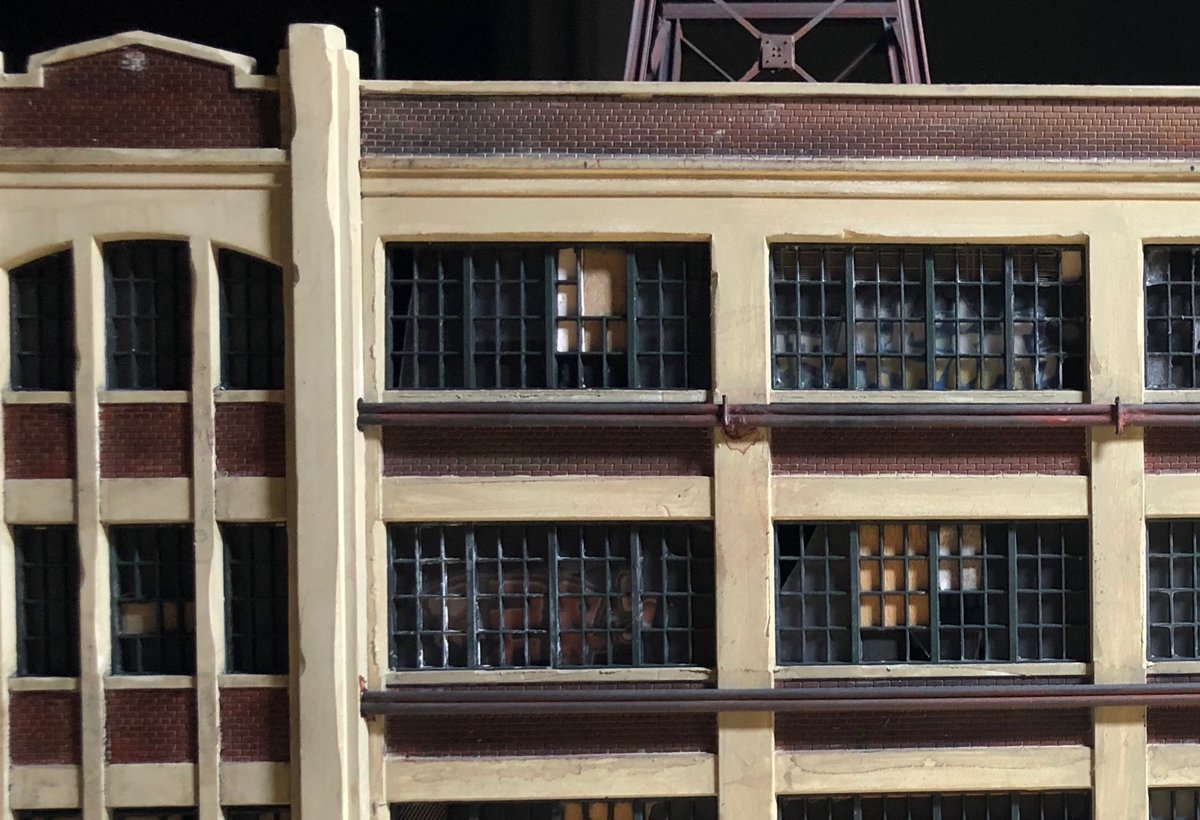
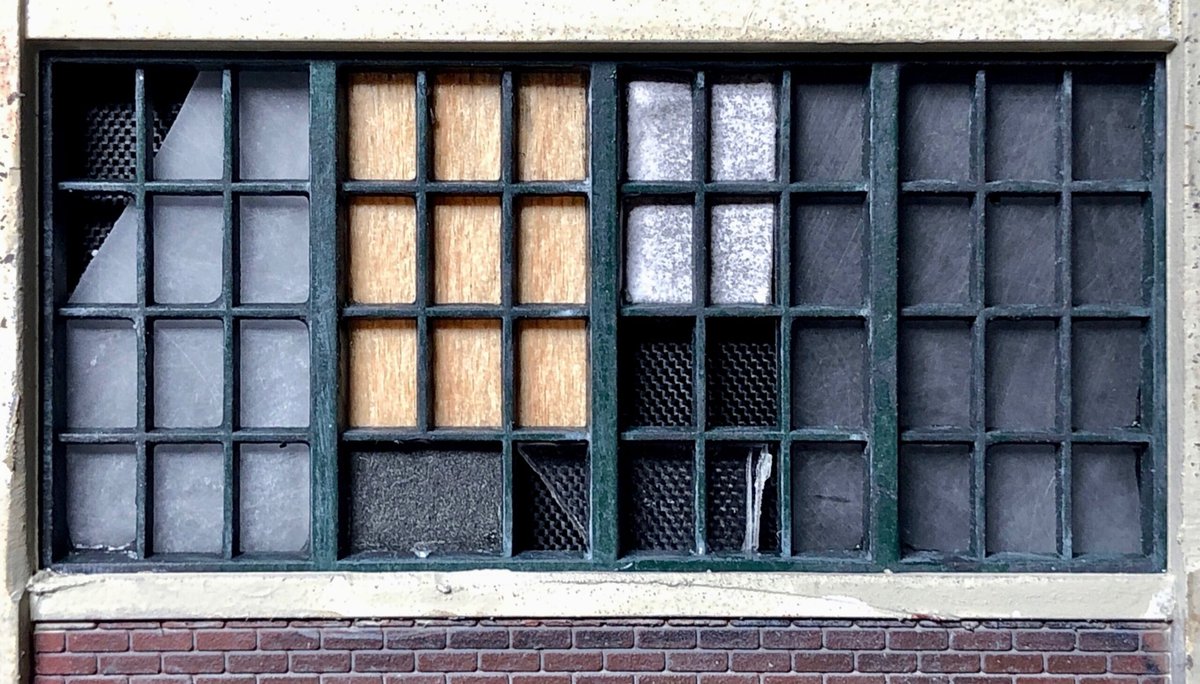
3. Play. Try. Fail and fail again. Get creative. Not everything will work but its usually worth trying a few new ideas to see which will give you the result that you are most happy with. There are usually many ways to achieve a specific look. For the windows I tried breaking plastic, used opaque scotch magic tape, a variety of clear glues, etc. I also used, paper, wood, screen…anything that might look interesting.

4. There are happy mistakes. (Otherwise known as, “I meant to do that”). I find that when it comes to weathering that less is MORE. But if you do overdo something – it can usually be ‘fixed’.
5. Paint everything BEFORE assembly and mask, mask mask and mask again. I’m a big fan of using rattle can spray paint as a base coat for the plastic pieces. Krylon ColorMaster Primer Oxide Red Ultra Flat is my goto for a base coat of brick and the Satin Ivory works well as a base for concrete. I’ll use acrylics applied usually by brush on top of the spray paint. Occasionally I’ll pull out the airbrush if I have to, but as I am without a spray booth at the moment, I try to avoid airbrushing. Good prep work at the pre-assembly stage while time consuming, does pay off with a much better looking model in the end.

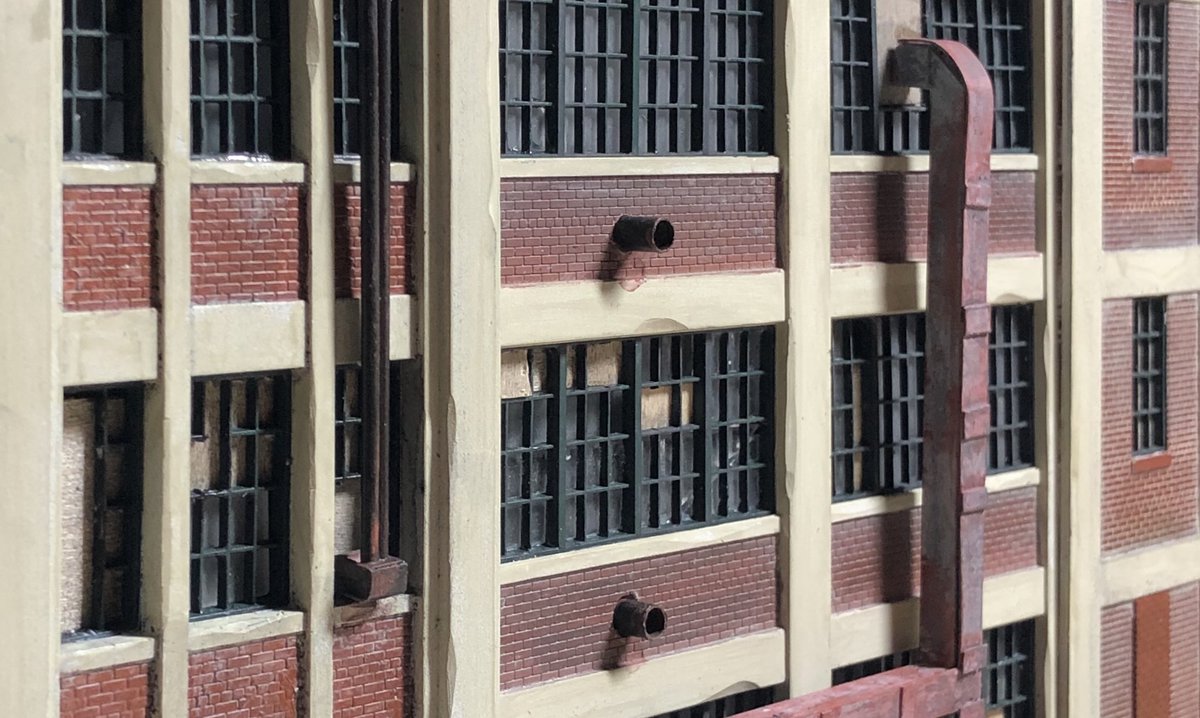
6. Add little details that are not part of the stock model. I call this ‘going down the rabbit hole’ as you can really get lost in the detail work. This for me is the fun part as it is the most creative. The photo research from prototypes can yield literally hundreds of little details than can be incorporated into your model to achieve that added realism. For example, I love all the piping that is found on factories and I have tried to incorporate this into my model.
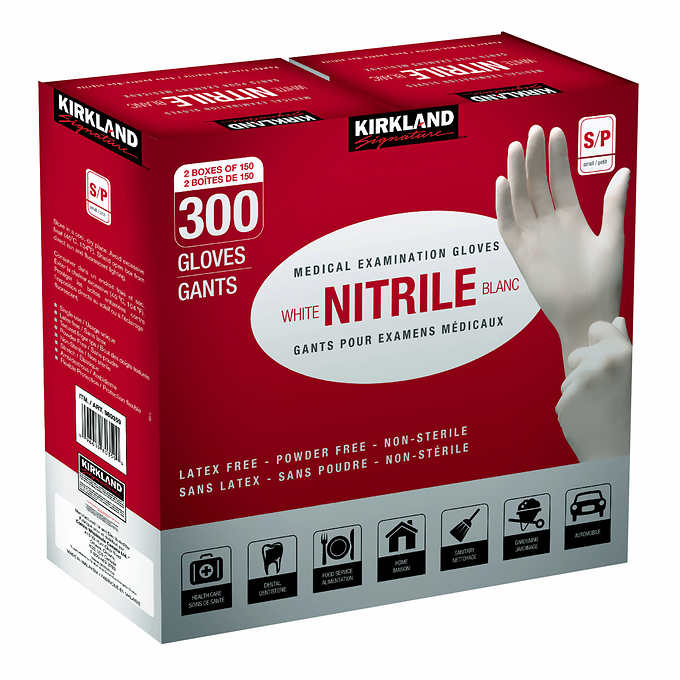
7. WEAR disposable nitrile gloves. Seriously, its amazing how much better the model looks when you do not have fingerprints and glue smudges. Not to mention, that I have reduced the number of times that I Krazy glue my fingers together. I buy the 300 pack from Costco.ca for $20.
8. Alcohol and india ink is your friend. I ‘weather’ everything with a 70% isopropyl alcohol/india ink mix. It dulls down the freshly painted look and a few light washes added over time work better. Dullcoat also is an essential ‘tool’ to knock everything down.
9. Adhesives. LOVE them and always have a bunch on hand. My three top picks are canopy glue, Krazy Glue CA and Tamiya 87038 Extra Thin Cement.
10. Take a photograph of your work. Look at the photo and critique the photo and not the model. It’s amazing what your eyes miss looking at a ‘real’ model and can catch by looking at a photo. Or put another way, our eyes lie to us. Having read a little about this (may be a future blog post) all I can figure out is that what our eyes see isn’t really real, it is what our brain has created. Perhaps our brain process a flat 2D image differently than a 3D item?
And here is a BONUS lesson learned:
11. You are NEVER finished. But sometimes you need to just STOP.
20 Model Railroad Resolutions for 2020

New decade, new post…
Three years ago in January 2017 (what the hell!!!) I presented my (clearly) overly optimistic list of ‘to-dos’. Since a bunch of time has passed, it seemed to be time (ya think?) to check back in and re-evaluate where I am now and where I hope to go with the world’s best hobby in 2020.
Here are my 20 Model Railroad New Year’s Resolutions for 2020:
1. Get downstairs to the layout (see pic below) more often. The goal is 15 mins. per day or approx. 2 hrs per week minimum. I think I may have turned on the layout 3-4 times last year. This year WILL be different (I hope).

2. STOP going to Train Shows and stop buying NEW stuff. That means NO more new locomotives or plastic kits for me! I have a lifetime’s worth already. Driving time to shows + gas spent = time and money not spent on the layout.
3. START working with ALL the stuff I have. See the comment above. And sell what I don’t need/want.
4. Go Railfanning more often and incorporate my new hobby – DRONES! Look for some posts from above and if you’re in the Toronto area and want to go and foam at the tracks – let me know when and where.
5. Create a realistic TO DO list of projects and stick to it. Or try to. Prioritize said TO DO list, and start on Project #1. Now. Today. Here.
6. Project #1: Post at least a blog post per week. That’s 52 per year. I’m already ahead of last year, given that 2019 had a total of ZERO posts. 🙁
7. Do more with friends. Could be visits, operations, group work sessions. I’ve been more of a lone wolf modeller but there are so many excellent people in this hobby and the social aspect is the main reason why this hobby is so much fun.
8. Attend a convention. I’ve never been to one of the really big train shows/conventions and while this might contradict Resolution #2, Springfield just looks like too much fun. Realistically, it may be closer to home at the CARM Toronto Convention.
9. Go and photograph my prototype. It’s been six years since I last visited the QGRY (this is me in Quebec City in 2014) and I’d love to do a rail fanning trip this Fall to Trois-Rivieres and Quebec City to see what’s new and do some photography… and bring the drone!!!!!
10. Finish something. Yup. A pip dream, but it sure would be nice to actually complete a project. Could be a building or a scene (see #16 below) or really anything. Just to complete a project…ahhh.
11. Get the kids involved. Up til now, the kids (boys aged 14 and 11) have shown no interest in the layout. May have had something to do with me telling them in the past not to touch anything. LOL. But it would be nice to have a little help/company running some trains. Maybe this year?
12. Launch the WERR Toronto Ops Club. I’ve always wanted to start a small group of local West End Toronto Modellers and create a rotating monthly operating session. I know of two possible layouts close to mine – so if you live in west-end Toronto and have a layout that you want to operate with a group of like-minded guys – let me know!

13. Build up my collection of old railroad signs. I have a few wee bits of cool collectables but I’m always on the look out for nice original pieces for the walls of the layout room.
14. Learn more about how the real QGRY works and the timetables, trains and industries that I am trying to model. Research is one of the really cool aspects of this hobby and there is no shortage of information on the interweb. I’m always reading about new things that hopefully will make me a better modeller.
15. Build a custom locomotive. I have a number of locomotive projects planned; from simple weathering and modifications right up to complete strip and repaint jobs. These include:
16. Complete a Scene. Time to start working on and complete a single scene. As previously discussed, I have hobby ADD and like to jump around working on little bits here and there. For 2020, I plan to pick a scene a build it.
17. Build PQTX. I have one ‘fun’ and fictional industry on the layout. Poutine Quebec (PQ) will be a poutine factory located outside of Montreal and will have a number of company owned cars. Inbound will be cheese curds in PQTX reefers, potatoes in PQTX boxcars and light brown gravy powder in PQTX hopper cars along with packaging and other assorted supplies. Once a week there would be a PQTX tank car shipment called the ‘gravy train’ that would bring in a heavier grade of gravy for storage in onsite tanks. Outbound would be the finished Poutine Quebec product to market.
18. Weathering, couplers and weight. Early on I made a promise to myself that I would only run cars on the layout that had at least a minimal level of weathering. Well, reality hits and who can resist putting a shiny new car on the tracks. However, this year I plan to give each car a basic weather and a little detail work on the trucks and wheels. In addition, I plan to swap out all plastic couplers for Kadees and check their height. At the same time at cars will be weighed and extra weights will be added, if necessary.
19. Speed Match all my locos. The plan for 2020 is to start speed-matching pairs of locos so that I can have consists that actually run well together. It’s the precursor to getting trains ready for Resolution #20.
20. OPERATIONS!!! Following on from #12 above. This is why I built a layout. Since I began years ago, I’ve known that the goal is to get a group of friends together and operate the layout. BUT, I will fully admit that I am afraid of the work involved with operations. I’m not sure where and how to start. My feeing is that I want to use JMRI for operations but the learning curve is pretty brutal. This is a tough one, but hopefully 2020 will be the year it happens!
Phew. That is certainly a good start for now. I’m hopeful that each of these resolutions/ideas will morph into it’s own blog post… so please stay tuned for many more posts coming soon.
As always, comments, ideas and your thoughts are very welcome!
Bridge Weathering Techniques
Experiment time!!!!! So I found a crappy old plastic atlas bridge and decided that I would try weathering it a few different ways to see which way I liked the best. The winningest technique will be what I use on a much more expensive metal bridge.
First, I sprayed the plastic with Krylon Colour Master Primer Red Oxide Ultraflat.

Christian Maheu suggested that I use my airbrush to add some different tints of rust on top of the primer with dark brown acrylic paints to give it some depth. You can see the result in the bottom of the two bridges in the image below.

Next up I will try weathering it with the following scenarios:
1. Hairspray technique
2. Salt technique
3. Rubber cement
Hairspray Weathering Technique
This was the technique that the majority of people liked the best. And I have to agree. Here is how it works… Paint the base colour, which in my case was the red oxide primer, and let it dry. Then spray cheap hair spray (I used Silkience Pump Hairspray) over the entire area. Once the hairspray dries completely, coat it again with hairspray and let that dry. Do not rush this. Then airbrush black acrylic paint on top of the hairspray and let that dry.
Next take a wet paintbrush and very gently rub the black paint off. I was amazed at how quickly and easily the black started to flake off and peel. Careful not to overdo this. LESS IS MORE. The result below still needs a spray of dullcote but you get the general idea.
Here is a great video tutorial on the Hairspray method.
Salt Weathering Technique
This was everyone’s second favourite method. It’s also super easy. Like the Hairspray technique I started with the same base coat of Krylon primer and airbrushed brown acrylic paint. This time, I sprayed the entire area with water containing a little 70% isopropyl alcohol. Then simply sprinkle coarsely ground sea salt (or in this case Himalayan Pink Salt that I stole from the kitchen) over top of the bridge. Let the salt dry completely. Once dried, airbrush black acrylic paint on top of the salt and let that dry as well. Then is it simple a matter of running the salt under some warm water to dissolve the crystals. NOTE: I did not have any luck rubbing the salt off, the water worked much better.

Here is a great video tutorial on the salt method.
Rubber Cement
Finally I tried using rubber cement on top of the base coat instead of salt to see if I could control the area to peel off and while it did give better control, the result wasn’t as satisfying.


A number of people have suggested that I combine methods and that may be my next experiment!
Why Don’t We Take the Train?

Last weekend my 11-year old son and I took VIA Rail from Toronto to Ottawa for a quick two-day father/son road trip. The main reason for the trip was for some onboard railfanning but I hadn’t been on VIA in many years and was curious to see how it measured up.

I was lucky enough to ‘win’ a free business class return trip ticket from work, however when I learned that the seat for my son would add an additional $398, I traded in my biz class ticket to buy him a more affordable $106 economy ride.

We left Toronto’s Union Station on VIA 52 (6411 to Montreal and 6429 splitting of to Ottawa) departing Saturday at 9:20 and luckily enough we were able to hitch a ride in business class there (long story with details omitted to protect the innocent). It was a fabulous way to travel.

A friend who works as a CN dispatcher warned me that we wouldn’t likely see much from the train as “The Kingston sub Is Canada’s high speed rail corridor, It’s not the TGV, but things move fast on there and…You are either traveling at 92 or 95 mph so the meets are a blur, you may overtake a moving freight train so you might get to see the side of some box and tank cars going by at 45 or 50 mph if they are on your side of the train...”


Turns out it wasn’t such a bad way to railfan. In addition to some high speed and lower speed freight train meets, I enjoyed seeing customer sidings and the general lay of the land. Unexpected bonus included this pretty awesome flatcar load in the Belleville yard.

On the way home on Sunday (VIA 55 departing Ottawa for Toronto at 3:20pm) we were back where we ‘belonged’ in Car 5. The difference with business class was very apparent as the old LRC train car was literally falling apart.

One benefit of being in the last car of the train; however, was that I was able to grab some excellent video out the back door including this VIA meet in Brockville yard. Also notice the flatcar loads of ingots/alumina from Arvida at left/north side.
[wpvideo vY6UcWZV]
All in all an excellent weekend away in Ottawa and a really fun way to travel there. Thanks VIA!

2017 Project Planning

Like most modelers I seem to have an endless list of unfinished projects.
Many projects start, but very few seem to finish. So in the spirit of making January new year’s resolutions, and in the hope that by writing them down they will miraculously get done, I present my overly optimistic list of 2017 ‘to-dos’ (in no particular order):
DCC
1.Troubleshoot JMRI. No idea why, but when my laptop updated to the most recent MacOS v 10.11.x my JMRI stopped working. Or more specifically JMRI is working fine, but Decoder Pro isn’t programming decoders anymore. No idea why I can no longer read or write to decoders, but my guess is that it has something to do with my Zephyr Xtra DCS 51 not properly communicating with the Digitrax PR3 and I am sure that this little project will occupy many frustrating hours.
2. Set up Command Stations & Boosters. Happily, Steve Juranics gave me a great deal on a used DB 150 Command Station and I plan to hook this up to the DCS 51 – as either the command station or as a booster. The DB 150 has 5 amps of programming power and provides that bit of extra juice to program the troublesome Atlas engines with QSI sound decoders that didn’t seem to want to work with the Zephyr (unless I was programming in blast mode). Part of this project will also involve setting up power districts and hooking up a couple of PM42 Quad Power Managers.
3. Speed Match all my locos. Conditional on actually getting Decoder Pro to successfully program a decoder, the plan is to start speed-matching pairs of locos so that I can have consists that actually run well together. It will be nice to finally have smooth running pairs instead of the pushing and pulling that I’m used to.
Tech
4. Arduino. I am inspired. After reading Geoff Bunza’s great article A modeler’s introduction to the Arduino in MRH in Dec, I have most of the bits (and almost enough very basic knowledge) to put together a couple of really neat Arduino projects. First up, I will finish the Tardis project started a year-and-a-half ago. The plan is to trigger the flashing light on top of the tardis and play the dematerialisation sound whenever someone approaches it on the layout. This can easily be accomplished with a PIR motion sensor; all I need to do is figure out how! Next up will be railroad crossing lights and bells for three roads on the layout. Also check out a great series starting on YouTube Model Builders called the YTMB Arduino workshop.
Layout
5. Oh yeah, that. I guess that in all the ‘fun’ stuff I should also include the track and scenery to-dos. After laying the mainline and key switches with tortoise switch machines, I have been troubleshooting my track work and have found a couple of places that need a little TLC. I will continue to sand, fill, gap and redo until the mainline track is flawless.
6. The Paper Mill. I plan to attack the complex track work in the paper mill section next on the theory that once done, I can have some fun switching if I want a distraction. There is no shortage of track to lay and it would be nice to have it all finished by the time the year comes to a close.
7. Scenery. I’m not one for the step-by-step approach to model railroading. I know that some people attack all of the benchwork, then all of the track and wiring before moving on to scenery. Call it hobby ADD but I get bored easily and like to mix things up a bit. Two areas of the layout are ‘done’ and the track in those sections isn’t (yes I know) going to change. I’d like to start building the farm scene in some detail and start on the Ciment Quebec scenery.
8. Structures. I’ve never built a kit. Yup. It’s true. Not plastic, not wood… nuthin’. And that’s gotta change soon. I have quite a large supply of wood and plastic kits that I purchased over the years and now it’s time to start building. First up will probably be a wood barn kit for the farm scene or a couple of the cement work structures.
Rolling Stock
9. Weathering, couplers and weight. Early on I made a promise to myself that I would only run cars on the layout that had at least a minimal level of weathering. I plan to give each car a spray of Dullcote to remove the plastic sheen, a quick dusting of Pan Pastels and a little detail work on the trucks and wheels. In addition, i’ve noticed that most of the couplers need a little bit of attention. I plan to swap out all plastic couplers for Kadees and check their height. At the same time at cars will be weighed and extra weights will be added if necessary.
10. Locomotives. I have a number of locomotive projects planned; from simple weathering and modifications right up to complete strip and repaint jobs. These include:
- CFL 114 – MLW S13u BELL-GAZ switcher
- QGRY 6908 – a SD40-3 originally built as CN 5198 (SD40)
- a couple of fictional additions to the G&W family including the B&B (named for Bernard & Ben)
11. Centerbeam Lumber Flatcars. One of my most important goals this year is to have some decent items to bring to the 2017 Toronto Railway Prototype Modelers Meet. Last year I met Chris van der Heide who showed me some of his fantastic lumber loads, and I’ve been busy at work getting this project ready for the next Meet on Saturday, March 18th, 2017.
12. Ecofab gondola covers. The project that I am most proud of and most excited about is my scratch-building of some Ecofab gondola covers out of styrene. This will be the subject of an upcoming blog post, so I’ll leave the details of this project til then.
13. PQTX. I haven’t blogged about this in any great detail other than here, but I have one ‘fun’ and fictional industry on the layout. Poutine Quebec (PQ) will be a poutine factory located outside of Montreal and will have a number of company owned cars. Inbound will be cheese curds in PQTX reefers, potatoes in PQTX boxcars and light brown gravy powder in PQTX hopper cars along with packaging and other assorted supplies. Once a week there would be a PQTX tank car shipment called the ‘gravy train’ that would bring in a heavier grade of gravy for storage in onsite tanks. Outbound would be the finished Poutine Quebec product to market.
Phew. There are more ideas in the works but that is certainly a good start for now. It’s likely that each of these projects will morph into it’s own blog post…so please stay tuned for many more details coming soon.
As always, comments, ideas and your thoughts are very welcome!
Mystical Landscapes (and trains)
 I went to see the Mystical Landscapes exhibition at the AGO last week and it got me thinking about light. Specifically how I was lighting the layout. What got me going on this theme was the series of haystacks by Monet. The series is known for its ‘thematic use of repetition to show differences in perception of light across various times of day, seasons, and types of weather.’

Up until now I had been using the standard 4′ fluorescent fixtures above the benchwork. At 5000K they do a good job and they work well at making colours look natural, but they only provide the look of a bright sunny day. Not always the average lighting in late October on my prototype. What if I wanted to explore how a scene on the railroad might look in early morning, or at dusk? As Monet’s haystacks revealed, changing the light creates a whole new scene. Changing light also creates new emotions associated with that light.

For example, recently I found the image pictured above on Tom Vaughan’s Facebook page. It struck me in a way that no other photo of a train had. It’s a powerful and gloomy image full of emotion. The photograph conveys the sense of the damp and cold. It was taken on a cloudy short winter day, in an isolated and northern landscape. Not the prototypical train porn shot usually taken in bright sun. The focus of the picture seems to me not to be the train at all. The train is simply part of the landscape. Indeed I would call this a landscape photo with a train in it. That’s what I hope to recreate on my layout and light is one of the ways I hope to achieve this goal.

While I was at Costco picking up some New Year treats, I noticed a great deal on a multi-colour LED strip. With 8 different colours in addition to white (red, purple, blue, green, yellow etc.) and 4 different light levels, this gave me 36 different lighting options to play with. At $40 for 24 feet, this worked out to $1.66/ft. Reasonable enough for a bit of fun.

Initial results have been quite positive. I really enjoy being in the layout room and running trains with different and dimmer light sources. While perhaps not achieving a 100% realistic version of a night scene (above), the soft, diffused light, muted tones and hazy outlined objects introduce the strong sense of mood that I had not previously experienced on my layout.
Recent Comments